In the last week I've spent some time creating my very first handmade card, and with Valentine's Day just around the corner I decided to make a card for the Hubby. I finished the card a few days ago and I wanted to share my process with you (while secretly hoping the Hubby doesn't read this post!), so below you'll find out how I created my very first handmade Valentine's Day card.

All you need is love. But a little chocolate now and then doesn't hurt.
Charles M. Schulz
First of all I spent a lot of time doing research online, reading about the kinds of tools I'd need and what card to use. Once I'd settled on my design and had my tools at home ready to use I got started.

1 pre-made white card (with envelope), a heart hole punch, a pencil, glitter glue, paint samples,
an "I love you" stamp, and a red foil card.
Above you can see I gathered a few tools, the small red cards are paint sample cards from B&Q that you can pick up for free and they're really useful when you want to cut out small icons. I have small hole punches for my hearts and they work perfectly with those paint samples.
I chose red foil card to use as my border and cut this using my paper trimmer then glued it onto the pre-made card. I bought pre-made cards with envelopes as I don't think I'm quite ready to do my own! After the foil card was stuck on I cut another piece of white card to place on top, but this time I used foam adhesive pads to raise the white card.
I put the card to one side and gathered more tools, I'd used my heart hole punch to get my hearts and wanted to make them raised on the card. I used the glitter and a small paint brush to add a little sparkle to a couple of the hearts. While they dried I cut a small piece of string and separated the strands using my tweezers. This gave me my strings for the heart balloons.

Tweezers are great for fiddly, small details.
Once the glitter hearts had dried, using my adhesive squares I stuck one side onto the back of each heart, securing the string in place. Then I took the heart balloons and stuck them onto my card.

Again I put the card to one side. Next I got on to sketching my little character to go on the front of the card. This is probably the part that took the longest.
I measured the card and drew lines so that I knew how big my character had to be and began my sketching. My first pass was okay but I felt like I'd got the proportions slightly wrong, but it was a good practise as my second try went a lot quicker.

With my second sketch drawn I went over the main lines in a black fine-line Sharpie, which gave me the outline of my main character. But of course I still had the pencil lines left so I carefully erased the pencil lines.

Lobsters are red right? But what kind of red? I had lots of colours to choose from and lots of forms (pencil/pen/stamp/paint). I wanted to get it right so I used my first sketch to try out different modes of colouring in, deciding that the red Sharpie worked best.

Before colouring the whole lobster I coloured the smaller areas to make sure the colour worked and then coloured the whole thing.


I'd used regular paper for sketching and colouring my lobster but it was too floppy to put straight onto the card. I decided to glue the lobster to another piece of card and then cut it out. I found this bit quite difficult as it's been a long time since I did any intricate cutting.
Once I'd cut out my lobster I used my adhesive squares again to stick the lobster onto my card.

To secure the balloon strings onto the lobsters claw I used double-sided sticky tape, cutting a very small piece and placing it where I wanted the strings to sit. All the small cutting and placing was tricky and I found that using tweezers was helpful and I didn't get my hands all sticky or end up with giant finger prints all over the card.
We are most alive when we're in love.
John Updike
Next came the stamping. I bought some stamps from Amazon and had already got some ink, I was nervous about this part because if anything went wrong I'd have to start all over again. I very carefully placed my stamp into the ink and stamped it onto the card, hoping that I didn't mess up.
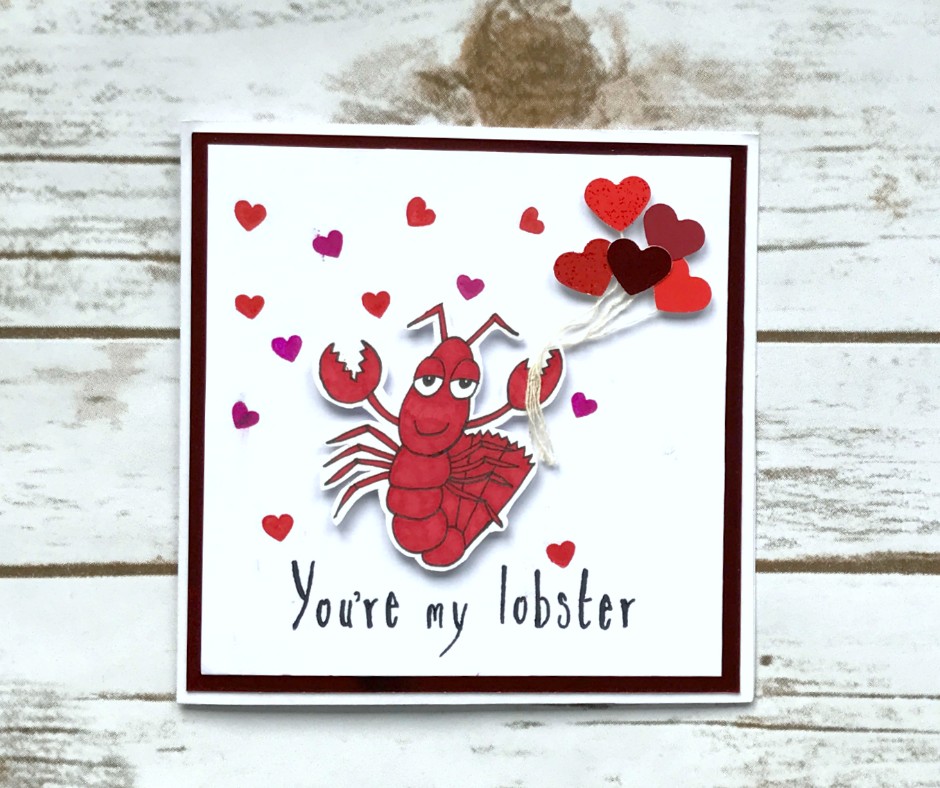
On lifting the stamp I saw that it had worked and was happy to add more stamps. I grabbed my heart stamp and went a little crazy!

As you can see some of the stamping didn't go as well as others, and the fact that I'm missing an apostrophe in "you're" really bugged me. But I read an interesting tip online, it said that if you make mistakes when stamping you can use markers to colour in where your mistakes are. So that's what I did, I coloured a few of the hearts and added an apostrophe using my coloured Sharpies.

I did have one or two mistakes but for a first try this went well and I'm pleased with my results. So much so that I've decided to do more!

There are loads of family birthdays coming up so that'll be great practise. I hope I can bring you more of my successes in card-making.